Thursday, October 22, 2015

27th Regiment d'Infanterie de Ligne

This installment of the Napoleonic French project has the first and second battalions of the 27th regiment.  It so happens that between Warlord and Victrix I had both battalion flags.  This is the only regiment that I have more than one battalion flag for so I had to do both.

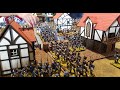
Like the other installments these figures are all Victrix.  The next batch is likely to be Warlord but it will be a ways away.  Time to take a break from these guys.

1st Battalion 27th Regiment

1st battalion command

1st battalion grenadiers

2nd battalion 27th regiment

2nd battalion command

2nf battalion voltiguers
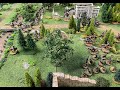
The 27th regiment

Sunday, October 4, 2015

No Man's Land - A Great War Battle Report

Tom and I got together yesterday for our second Flames of War Great War battle.  The scenario we played was No Man's Land.  Tom had picked his own set of trenches so this was a good excuse to get them on the table.  The forces were the same lists we used for our first game but this time Tom would play the Germans and I took the British.

This is an interesting scenario and very different from other FoW scenarios I have played.  The table is divided into quarters.  Each player has a trench line on their side.  The main deployment zone for each player is from their trench line to their table edge.  The Germans would be the attackers and the British defending.  Each side placed an objective in no man's land and near each friendly objective is a patrol platoon.  The goal is to capture the enemy objective while defending their own. 

The initial deployment.  Germans at the top with a platoon of HMGs, reinforced with AT rifles and grenatenwerfers.  The German patrol was deployed in no man's land to the British right.  Backing up the German patrol was an A7V tank.  The British are on the near side with their patrol to the left.  The British trench was empty except for the commander and 2iC.  The British did have three HMG pits, 2 to the left and one right, and 2 18 pdr pits, one center and one far left.

The German patrol with the A7V in support.  As the attacker the Germans only had to hold half of their platoons in reserve and could start with a tank on the table.  The German trench was also well manned with support weapons running the entire length.

The British patrol starts near their friendly objective and supported by guns and HMGs.

The first couple of turns had the German and British patrols moving towards each other in no man's land.  The Germans were more aggressive and moved to attack.  German flamethrowers did their damage but their assault was repulsed by defensive fire.

At this stage both the Germans and the British were tempted to make very bad moves.  The British thought about continuing their advance on the German objective but corrected switched to the defensive lead by the CO.  The Germans were then tempted to advance into the British trench to flank the HMG pits.  They wise stayed on mission and move to capture the British objective.  The stage was set for an epic struggle.

For a couple of turns the British and Germans engages in a brutal fire fight and assault.  The Germans made many saves but the British were not so lucky.  The Germans wiped out the British patrol and left the CO alone in no man's land surrounded by Germans.  The British needed to get two kills to trigger a platoon test and the Germans would need to fail two motivation tests to prevent the Germans from winning.  This was a lot to ask considering how well Tom had been rolling all game.  Against all odds the British fire triggered the needed test and Tom failed the first test and then the re-roll from the company commander!  The fight would go on.

Meanwhile, the British reserves were slowly making their way onto the battle field.  They were well positioned to capture the German objective as long as they could make it across the wire and the German reserves didn't get there first.

The German reserves enter the battle and make good speed to secure their objective.  But before they could clear the trench line they came under sniper fire and the German officers could not get them to advance any further.

The German A7V, guarding the objective, was knocked out by fire from the 18 pdr.  All that was needed was an aggressive advance by the British and the battle would be won.  The British Mk IV tank bogged on the trenches but the infantry was able to advance.  Avert skillfully crossing their wire the British secured the objective and won the battle!
This was a great battle that was moving strongly in the German's favor until the last turn.  Tom's failure to unpin his reserve platoon along with the British veterans easily crossing their wire spelled doom for the Germans.  Frankly, this battle should have been over on turn four with the fight in no man's land but my luck really turned at that point in the game.  So far we have had two really good games of WWI and I must say I think Battlefront has done a really good job.  I can't wait to get the official release and start working on an American army.