Showing posts with label Battle Report. Show all posts

Monday, April 15, 2019

A Kill Team Battle

Yesterday Tim and I got together for a game of Kill Team.  This was my 5th game since we decided to try the game out earlier this year.  This would be our first game using our own custom Kill Teams rather than the pre-generated teams from the starter set or the Rouge Trader set.  Tim used is Deathwatch kill team and I took my trusty Orks.

For this game we selected the Terror Tactics scenario.  The setting is a ruined sector frontieris settlement that has been taken over by an Ork Mekboy for his workshop.  The the goal of the battle is to do as much damage to the enemy as possible.  The first kill team to break is the looser. For this game we actually forgot to use any of the sector special rules.

Deployment is complete.  For the Scouting Phase the Orks select Take Forward Positions and and the Deathwatch selected Eliminate Sentries.  

Ork gunners move up to take better firing positions.

Deathwatch marines target the advancing Orks.  They score a single flesh wound on a Loota.

Orks advance on the DW who are taking cover behind the Mekboy workshop.

After a couple of turns of moving and shooting the Orks in the center have closed into melee with the DW.  Meanwhile the rest of the Orks are providing covering fire to keep the rest of the DW occupied.

The dense terrain made for some very close action.  A failed charge leaves and Ork in a bad spot.

DW Marines are dropping like flies.  The Grot has just killed a Space Marine with a close combat pistol shot and now looks to join another fight.

The DW sergeant has fallen and now this loan Space Marine is overwhelmed. He would stoically fight on as the rest of his team falls.

The loan surviver of the Deathwatch kill team manages to take out one more Ork and this results in the Ork force breaking.  The marine passes his break test and wins the battle.

At truly epic battle and a shocking win for the Deathwatch.  The marines took hit after hit and made save after save and took piles of flesh wounds before going down.  I really though that the Orks had this but time and again the failed to get that last wound.  This was the best game so far I think.

Tim and I are slowly getting the finer points of the game.  I still struggle with the command abilities.  What can I use and when is at the center of this.  I frequently forget to use these abilities at all.  Another aspect of the game that we have not yet used are the specialist traits.  This will open up new dimensions once we figure out how to use them.

Saturday, June 9, 2018

Battle of Point 213


Long time followers of this blog are likely aware that I have had a dream, for many years. to play the Point 213 battle from the Flames of War Normandy Battles supplement.  But like many of these dreams it had to be more than just a game of Flames of War with 15mm models - boring!  So I came up with the idea of playing the scenario in 28mm using the Bolt Action rules.  This idea actually goes back more than 9 years.  Tim and I initially started work on this project in 2009 using Tamiya 1/48th scale tanks.  You can see my Firefly here.  This first effort did not go very far as the 1/48th scale kits, which were really all that was available at the time, were just a bit too expensive at about $40 each.  So the idea died.

Fast forward to 2016 and we have all the tanks needed for this game available from Warlord Games in nice new 1/56th scale plastic kits.  These kits were only slightly cheaper than the Tamiya models but the various online retailers offered better discounts and in the end a platoon of these tanks cost about the same as two of the 1/48th scale kits.  This was suddenly a doable project.

After many months, about a year and a half, of work we had finally collected and built all the models as well as built all the terrain.  I had hoped to have enough bocage terrain to do a full 8'x8' table but at the time of the game (which was the first time I had all the terrain out) we were a bit short and had the switch to an 8'x6' table.

The British forces consisted of a full armored company.  There were three platoons, each consisting of a Firefly and three Cromwell tanks.  The command platoon had three Cromwells and the battalion commander was in a Daimler Dingo scout car.

The Germans had 4 Tiget I tanks each acting as their own platoon.  Had we been thinking about this more clearly we should have given each a +1 morale bonus as a platoon leader.  I will changes this for future games.  Two of the Tigers have veteran crews and two had regular crews.  All Tigers had the Lucky skill from the Tank War book.  The Veteran tanks each had an additional skill.
The battlefield.  At 8'x6' it was not as big as I initially planned but still large enough for a great game.  We allowed tanks on the roads to follow the curve of the roads without penalty but we did not grant the road movement bonus (mainly as I forgot that BA had this bonus).  In future games I will likely add this back in.

The battalion commander (the Old Man) has called a halt to the British advance and is holding a conference near the farm house.  He is surrounded by the company command platoon.

The rest of the company is deployed along the main road leading out of Villers Bocage. While the commanders are in conference the tank crews dismount for a brew.  To represent this D3 pin markers are added to all British vehicles at the start of the game.

A British Firefly covers the rear of the tank column.

The first Tiger arrives on the table.  This is Tiger 234 commanded by veteran Unterscharfuhrer Herbert Steif.  Upon arriving in the table he immediately fired at the British Firefly but missed.  The Cromwell ahead of the Firefly returned fire and scored a hit and a penetration!  This forced 234 to use their Lucky skill, negating the shot.  But you can only use that once.

Tiger 223, commanded by veteran Oberscharfuhrer Jurgen Brandt, enters next.  He moved full speed down the left had road North of the British position.

Tiger 223 was quickly engages by a Cromwell at the crossroads but his 75mm gun did not have the power to penetrate the think frontal armor.  This would make the beginning of a long and surreal gun duel between these two tanks.  The tiger would fire at and hit the Cromwell several time but would be unable to know out the weaker tank.

The arrival of the Tigers, mostly from the North and the rear of the column sparked a mad scramble by the British to clear the road and gain firing positions. 

First blood would go to the Germans.  Newly arrived Tiger 211, commanded by Obersturmfuhrer Jurgen Wessel, managed to get a good firing position North of the British and knocked out this Cromwell.

The German celebration was very short lived.  Tiger 234 was hit and destroyed by a British Firefly at the rear of the British column.  The early luck shot from the Cromwell would prove decisive. 

After knocking out the Cromwell, Tiger 211 was faced with a quickly forming British gun line.
Tiger 211 is now stuck in a British shooting gallery.  The volume of fire would force 211 off the bocage.
The British push through the gap in the bocage and use their knocked out comrade for cover.  The Cromwells really need to get off the road before the German guns wake up.

The British gun line at the shooting gallery.  They would pore a relentless fire on Tiger 211, making it extremely hard for the German tank to make any progress.

Back on the German left Tiger 223 has advanced to the crossroads under a hail of British fire.  Tiger 221, commanded by Untersturmfuhrer George Hantusch, is in support.  The Germans have a good position but they cannot hit, and when they do they are not getting effects.  AT this point in the battle German gunnery has become a bit of a joke.

Tiger 211 has been flanked by the Firefly and another gun duel is in the making.  Both tanks would have some very poor results.
On the German left the weight of British fire has stalled the advance of the Tigers.  If you give those Cromwells enough shots will will eventually get a kill.  Those Tigers need to get moving.

By turn 8 (out of 10) the Germans have managed only a single Cromwell knocked out and have lost a Tiger.  The remaining Tigers are in very bad spots so it was decided that Michael Wittmann was recalled from his solo attack on Villers Bocage to support the rest of this company.  He enters the table in the heart of the fighting on the German right.

He promptly misses the Firefly to his front.

But the Firefly has already knocked out Tiger 211.
Tiger 223 is knocked out the same turn.  The only results this tank racked up all battle was to remove the lucky from one Firefly.  All other results were either no penetration or a crew stunned result.

Tiger 221 was also knocked out on turn 8.  This tank basically spent the entire game pinned on the table edge unable to hit or kill.

In the end the Germans suffered a humiliating defeat.  The numbers are stunning.  The final kill totals were 4 Tigers for 1 Cromwell.  Considering each Tiger had the Lucky skill, meaning they had to be killed twice, it is even more stunning.  Only the Firefly's had Lucky and of those only one, I think, used it.  I have really never seen such a bad string of die rolling.  Having said that, I thought the game was great and I really enjoyed it, but I played British.  Click here for a video battle report from Bill, one of the players.

We have played several, smaller, test games over the last year plus and this helped.  The results of these test games showed that the scenario is balanced regardless of the outcome of this game.  Past games have been 50-50 on the win ratio.  This game was just an extreme example.

A quick note on the rules of the game.  We used the Bolt Action 1st edition rules as that is the version we are playing (this was the last game of 1st).  I decided to stick with 1st as I am not entirely sure how the 2nd edition rules will effect the game.  We wanted the Germans to have something like the stormtrooper move from Flames of War to sort of help address the disparity in numbers.  Mobility is key.  We decided to allow the German player, at the end of each turn, to roll the order dice for each tank.  If the result was either advance or run the tank could make an immediate advance move but could not shoot.  This move did not require an order test so even heavily pinned tanks had the potential to move at the end of the turn.  This really worked well.

I plan to run this game again in the future, as long all all the models are available.  Future games will be using the 2nd edition rules which are now learning.

Tuesday, March 27, 2018

Battle of Salem Church - Black Powder ACW

On March 3rd my friends and I held the third and last game of our Chancellorsville Black Powder campaign.  Our first battle was almost 2 years ago.  We started with Jackson's flank attack against the Union XI Corps. About a year ago we played game two - Breakthrough at Chancellorsville Inn.  Both of these games were great fun and really huge.  For the final game we needed something to top them all.  This time it was Salem Church.  This game would be played as per the scenario in the Glory, Hallelujah! book, page 138.

As for rules we played mostly from the Black Powder rules with only a few of the Glory, Hallelujah! changes.  The woods were rated as Light Woods rather than Heavy Woods as the scenario calls for.  I just felt with the large table the heavy rating would just slow things to a crawl.  The Light Woods rules are from GH page 54.  We used the Passage of Lines from GH, page 59.  We used a variation of The Charge rules on page 61.  We do not apply the -2 penalty to the command roll for charging from the front.

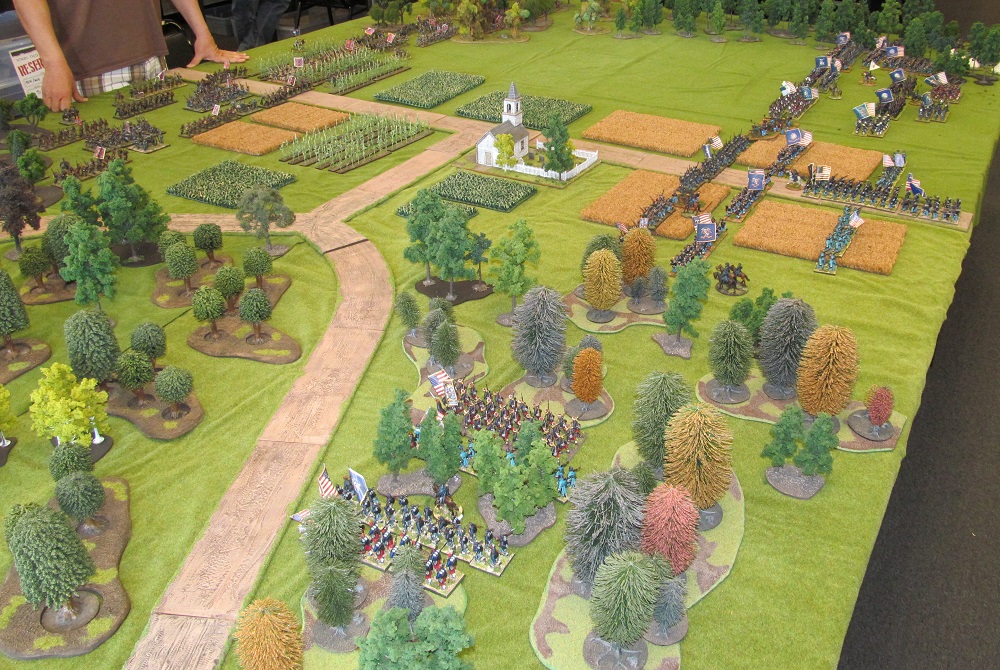
Salem Church in the center of the battlefield.  The fields are counted as open ground with no cover.

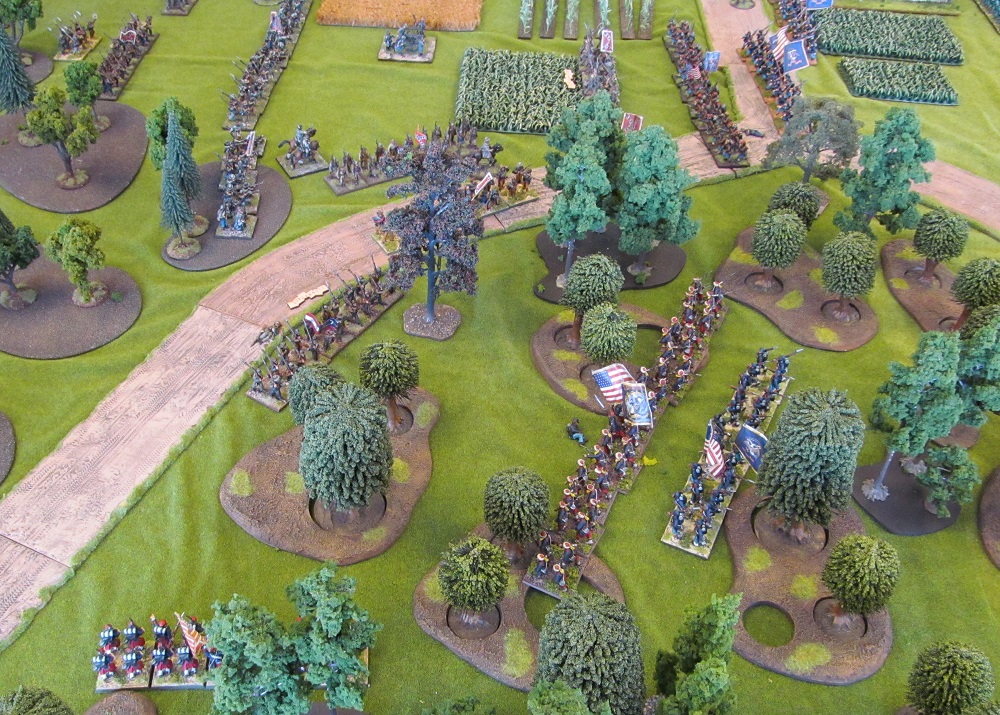
The South woods.  All woods are counted as Light Woods per the GH rules, page 54.

The entire battlefield looking North to South.  The table is 12' x 8'.

The battle would be fought on a 12' x 8' table.  The layout is as close to the map on page 138 that our collections would allow.  The objective for both sides in the battle was very simple - destroy the other army.  The battlefield would not really allow for subtlety.  The size of the armies would also make maneuver very tough.  Basically, move forward and grind it out.

South end of the Confederate line.  Wilcox's Brigade, Anderson's Division is along the road, and completely separated from the other brigade of the division (which was deployed on the other side of the table for some reason).  This would cause some command issues for the Rebs.  This would be the location of some of the most important and dramatic fighting of the day.

The Confederate deployment in the center.  McLaw's Division would hold most of the ground in the center for the Rebs. These brigades were exhausted after a forced march to get to the battle and as such they were limited to one move per order.  This had a bigger impact on the player than on the forces as they basically decided to stand fast all game. 

The Confederate deployment in the North.  Mahone's Brigade, Anderson's Division is in the woods with McLaw's Division to their right.  Mahone would put up a stubborn defense of these woods all game (but it probably wasn't very fun to play).

The Union deployment looking South.  The 3rd Division, VI Corps is in the woods and the open ground next to it.  The 3rd Brigade would have a tough time getting moving in the woods.  The commander would blame the terrain but lack of competent command and control was the real cause.

Over 1500 28mm figures deployed for battle.  It was a truly stunning sight.

The Union center.  Mostly the troops of the 3rd Division.

The Union deployment looking South to North.  The 2nd Brigade, 1st Division, VI Corps is in the woods in the foreground (me).  The 3rd Brigade, 1st Division  is in the center ready to advance on the church.  1st Brigade is in support acting as division reserve.

A game like this takes a lot of work to put on.  The setup took more than an hour and when you throw in army assignments, terrain explanations, rules updates and deployment the first roll of the dice was almost 2 hours in.  Before all that the figures had to be collected and painted.  This battle used more than 1500 figures from the collections of 5 of the players.  Several of the players worked hard to paint new units specifically for this game, myself included.  I also re-acquired some figures from a local gamer that had not been on the bale for a long time.  Virtually all of the terrain was also supplied by the players with only a few trees from the local shop.

The 3rd Division advances in the open on the Union right.  A dazzling sight but the Rebs have already taken up defensive positions in the woods.

The Confederates are trying to get units in line along the edge of the woods to pour fire into the advancing Union troops.  It appears that one Reb regiment has left their flank hanging open but the Uniion troops were too slow to take advantage.

In the center the 3rd Divion is rapidly advancing on the right but the 1st Division is lagging behind, or so it seems.  The union plan was to try and draw the Confederates in the South towards the center and then outflank them through the woods.  The plan was sound.

The 2nd Brigade, 1st Division makes its move.  The 46th Pennsylvania is used as bait to draw the Confederates up the road towards the crossroads.  The remainder of the brigade, in march column, moves into the woods to wards the open Confederate flank.

The Confederates slowly move units towards the church but poor command rolls are hammering the effort (not to mention exhausted troops).

Back on the North end the 3rd Division is slowed by withering Confederate fire.  Casualties are mounting and disordered units are blocking the advance.  The difficulties in passing through are not helping.

In the South woods the Confederates have been caught with their pants down.  They desperately reposition units to stop the Union troops advancing through the woods.  The 114th Penn has routed a Reb regiment off the road and is now on the flank of the entire Confederate army.  The 46th Penn, that was holding the crossroads has been routed but units of the 3rd Brigade, 1st Division have moved in to cover the crossroads.

The fight at the crossroads is reaching a fevered pitch.  The Confederates are desperately trying to stop the Union advance as well as contain the flank attack.  In the center the Union is in control of the church as farther North a bulge is forming in the Union lines.

The fighting in the South woods is getting brutal.  Wilcox's Brigade, Anderson's Division has broken and the remnants are retiring.  The Confederate flank looks to be in serious trouble.  The only help in the area is Wofford's Brigade, McLaws Division which is exhausted and having a very tough time repositioning.

The 3rd Brigade, 1st Division has been pressing the Confederates near the crossroads hard, maybe too hard.  They are near their break-point and the 1st Brigade has now been committed in the center near the church.  Both sides are showing signs of ware in the South end of the fight.

The Union 3rd Division has been pressing forward methodically and now a bulge has formed in the open ground.  The Confederates in the area look strong but they are taking lots of damage.

The 5th New York charges and Alabama regiment along the road.  A risky move but one that could pay off in a big way.  The 2nd Brigade is behind the main Confederate line with very little in front of them.

THe other two regiments of the 2nd Brigade are disordered and unable to move forward to keep the pressure on the Confederate flank.  This is the high-water mark for the Union.

In the North woods the 3rd Brigade, 3rd Division is halted by Mahone's Brigade.  It is like a wave crashing over the rocks.  The Confederates will not be moved even against huge odds.

The bulge in 3rd Division's lines.  I am not sure what is happening here but the lack of concentration in the attack would not produce positive results.

The Alabamans have been routed but not before shaking the 5th New York.  This along with the loss of the 46th Penn would break the brigade.  The 2nd Brigade, 1st Division begins to retire back through the woods.  The Confederate flank is saved.

The 1st Brigade, 1st Division also has had enough and begins to retire.  The loss of the entire 1st Division marks the end of the battle.
Back in the North woods the Confederates are only one casualty away from loosing the battle.

This was a really fun game but perhaps not as fun as some of our previous battles.  I really think that Black Powder games really shine when there is an objective to the battle other than simply kill'em all sorts of games.  In many ways this game was a return to how we played when we first started this and in really it felt like a step back.  I had been tempted to make my own scenario for this game and in retrospect I probably should have.

This likely marks the end of big battle ACW for a while.  I don't have any plans for anything of this size again.  I will be playing smaller games of ACW using Black Powder as I continue to explore point match games using GH rules.  For big games I am still dreaming of a large Napoleonic Black Powder game.