Monday, December 3, 2012

Black Powder ACW

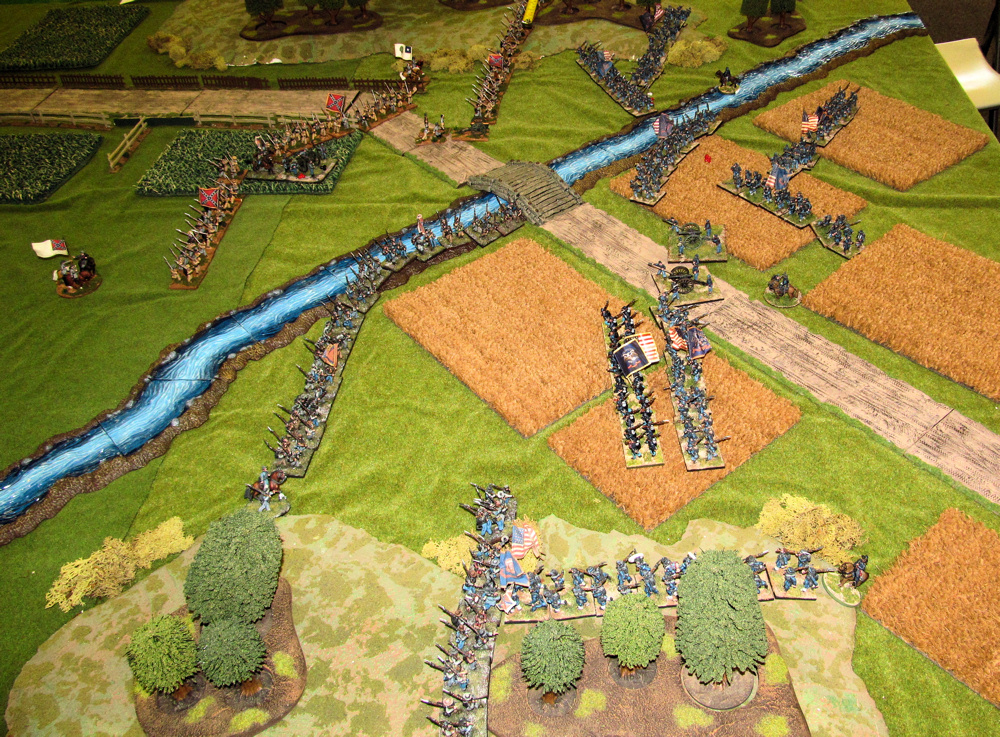
On Sunday I finally got to play a full and proper game of Black Powder.  This is something that I have talked about on the blog for the better part of two years. I got together with my friends Tim, Tom and Joe at the FLGS for our big game.  Joe has a large ACW collection in 28mm and Tom just finished the basing for his freshly painted Confederates (you can see pictures of Tom's troops on his blog).  My ACW collection has been steadily growing over the last couple of years but with Tom and Joe's collections I only needed to use a few of my miniatures.


Since I was the guy pulling this together it was up to me to come up with a scenario and determine the forces needed.   I thought quite a bit about this but I really did not put a huge amount of effort into it.  Since I really wanted to just get through the rules I did not want an elaborate and complicated scenario.  I settled on a simple rear-guard action at a creek crossing.  Basically the Confederates are holding a bridge and the Union must force a crossing of the creek.


The battlefield is an 8'x6' area with the creek crossing the table diagonally.  The bridge is roughly in the middle but a little closer to the Union side. The forces for the battle would be evenly matched using the basic troop and commander stats from the book.  We did not use any special rules for these units.  We did not allow the use of the 'attack column' formation as this was not used in the American Civil War.

Each side had two brigades of infantry, each brigade was comprised of four regiments of infantry (about 24-28 models per regiment) and one gun per regiment.  The initial game-plan was for the Confederates to have one brigade deployed on the board at the start of the game.  The Union forces as well as the second Confederate brigade would march on the board during their side's turn.


 The idea for the Confederate deployment was to deploy on one half of the table but behind the river.  I guess this didn't make that last bit clear and two Confederate regiments found their way across the river before the battle.  I didn't worry too much about this at the time since I was really just happy to be playing the game finally.  I would come to regret that attitude.


 Tom and Joe commanded the Confederate forces with Joe commanding the initially deployed brigade.  Tim and I commanded the Union forces.  Tim commanded the brigade on the Union right and I commanded the left.  The Union took the first turn as the attackers and had some simple deployment rules.  We had to enter the West end of the table in march column on the first turn.  We still had to make our command rolls and I promptly failed my first roll.  Luckily, being in march column and with limbered guns I was still able to enter the table but way behind my target line and still in march column.  Tim passed his first command roll but only got one move and so had the same problem.


Tim and I were both able to get our guns in action but without any real effect.   It was at this point that the two Confederate regiments on the Union side of the river became an issue.


The rebels moved aggressively towards the road taking a position to enfilade anything moving towards the bridge.  The second regiment was able to advance but was unable to deploy into line.  Tom's brigade made a good command check and entered the East end of the battlefield and deployed into line.  We was in a position to fill the huge gap on the Confederate left directly in front of Tim's brigade.  At this point I felt that Tim would have plenty of time to cross the creek and establish a good defensive line.


On the Union left I saw an opportunity to catch the rebels flat-footed and deal them a heavy blow.  All I needed to do was advance along the ridge line to the South and  deploy into line.  From there I would be able to fire into the rear of Joe's Texas regiment along the field.  But a poor command roll meant the Union troops would make it onto the ridge but be stuck in march column...in the face of the enemy.  I was able to deploy a second regiment into line ready to hit the Texans hard.  The combined fire from this regiment as well as the brigade battery disordered and hut the Texans badly.


On the Union right things were not going as planned.  Another round of mediocre command rolls meant that Tim's brigade was wading through the creek rather than setting up a defensive line on the far bank.  Tom's brigade showed a great deal of aggressiveness and elan as it raced forward to close the gap in the Confederate line.  Once in position his troops poured a merciless fire into Tim's regiments stuck in march column.


In the midst of the hail of fire Tim was able to deploy the brigade into line and deliver a return volley, however, the effect was minimal.  Back on the Union left the rebels fired on the marching regiment on the ridge doing many casualties and disordering the unit.  This would prevent the unit from deploying into line and forced the brigade commander to attempt to rally the troops.  In front of the Texans I now had a regiment with one in support and both batteries.  The Texans broke and fled.


 With the Texans fleeing Joe charged the ridge and moved the rest of the brigade across the creek.  The fight on the ridge was not going to be good for the Union.  With a 6 to 1 disadvantage there did not seem to be any chance of a win and loss would have meant the loss of the brigade commander, who was attached to rally the troops.  But in a turn of good luck for the Union the fight was a draw and the Union regiment was able to form up into line (though disordered).


Back on the Union right Tim was still taking a pounding.  Casualties were mounting and nearly all the units were disordered.  Return fire continued to be ineffective.


Tom kept up a relentless pressure and Tim;s brigade began to crack.  At this point the brigade attempted to retire to the creek and dress the line.


On the Union left things were going much better.  A second Union regiment joined the fight on the ridge and the rebels were driven back.  The fresh Confederate regiments crossing the creek suffered heavily for their boldness.  I still had both brigade guns in support on this flank which, in retrospect, may have been one of the reasons things were going so poorly for Tim.


The fight on the South ridge settled into close range exchange of volleys with the Confederated come out on the loosing side.  Another regiment of Joe's brigade was routed and a large gap appeared in the Confederate line.  But on the Union right Tim's Brigade had finally had enough and began to withdraw.


Joe's brigade would continue to take a pounding until it to broke and withdrew.  Tom was able to redeploy his nearly fresh brigade into strong positions along the creek.


At this point both armies were broken and would have retired.  Based on the scenario the Confederated succeeded in preventing a Union crossing of the creek and the Union was unable to cross and destroy the defenders so the win goes to the Confederates.

So there you have it, a great game!  It looked great on the table and the rules are easy and fast.  It took about three hours to play through which I think I amazing.  We a definite result which is important to me.  I like a game that 'ends.'  I know we did a few this wrong which is expected since it was the first time any of us have played a full game.  The scenario idea worked and could use some tweaks but I think it could be played again.

I WILL be playing more of this game.

Wednesday, November 7, 2012

Shoota Boyz


Nineteen more boyz, this time with shootas.  Maybe these guys will work better.

Tuesday, October 23, 2012

Sixth Edition 40K Orks - Random Thoughts #1

I have now played 4 games of sixth edition with my Orks and I am starting to learn a few things (I am not real quick sometimes).  I just want to share a few of my thoughts and maybe get some feedback.

The Warboss is a total bad-ass but the challenge mechanism can be a real bitch sometimes.  The first key to success with the challenge rules are NEVER have an independant character in a unit that does not also include another, weaker, character.  For Orks this means the Warboss should never be in a unit of Nobz (as of the most recent FAQ, units of Ork Nobz are no longer considered characters, therefore they cannot issue or accept challenges).  The reason for this is you always want to have options when a challenge is issued as to who will answer the challenge.  With only one character in the unit you either refuse the challenge, and take the ding, or answer with the only character in the unit.

The loss of character status for Nobz in there own unit is not all a bad thing.  Nobz in their own unit can still be upgraded just as if they were characters which means that special equipment, such as Power Klaws,  cannot be sniped out by a challenge. This allows a large unit of Nobz, unburdened by characters, to actually hunt down loan ICs or Monsterous Creatures, as well as take on very tough units.  From now on my Nobz run character free.

Since a unit of Nobz is no longer a safe place for the Warboss where should he go?  Obviously, running around alone is not safe.  I think the Warboss would work well attached to a large unit of Boyz lead by a Nob.  The Nob leading a unit of Boyz is a character and can issue/accept challenges.  In a unit like this the Boss will be safer and still have aditional options with challenges.  The best place for him might be in the middle of a huge mob of Gretchin with three Runtherds.  The Gretchin will soak up huge amounts of shooting and each Runtherd is a character that can help with challenges.  Just for the record I do not like challenges but they are here to stay (for the next 4 years anyway).

That is all for now.  Maybe next time I will talk about infantry on foot vs. infantry in tranports...

Friday, October 19, 2012

Deffkoptas

 I finally finished my first batch of Deffkoptas.  I have had these guys for a while and used them a couple of times but I could never get into painting them.  They are kind of a pain.  I have several more and I plan to do some different weapon options.  These are all stock twin-link rokkit launchas.  These just might see some table time this weekend.


Sunday, October 7, 2012

Bolt Action


A couple of weeks ago I got my copy of the Bolt Action rules.  I have really been looking forward to the release of these rules for a long time.  I have been playing 28mm WW2 games for many years and none of the rules have really been what I have been looking for.  I have even tried my hand at writing my own rules.  Once I heard that Warlord would be writing rules for their Bolt Action model line and that these rules would be written by Rick Priestly and Alessio Cavatore I knew it would be a must have.
 
I was starting to get a bit worried about the game.  My local shop got a play-test copy of the rules and several people started trying them out.  Every time I would see a game or listen their explanations I was sure I was not going to like the rules.  Then Rick would publish an article and I would think 'what are the guys at the shop playing?'  They just did not seem like the same game.
 
Once I read the rules myself (the actual published rules) I knew I was going to like the game.  The rules are very straight forward and are written clearly.  Morale plays a huge role in the game and when combined with the order system provides a tense and dramatic game.
 

My firend Tim and I decided to give the game a try today.  We did 1000 points per side as this is what Rick recommends and the standard size game.  I went with Soviets and you can see my army in the picture above.  This is actually only 995 points.  My list comprised the following units.
  1. Vet Senior Lieutenant with 2 Vet soldiers all with SMG
  2. 10 reg soldiers with LMG, 2 SMG and AT grenades
  3. 10 reg soldiers with LMG, 3 SMG and AT grenades
  4. 10 reg soldiers with LMG, 3 SMG and AT grenades
  5. 10 vet soldiers with LMG, 5 SMG and AT grenades
  6. 11 inexperieced soldiers with LMG, 7 SMG and AT grenades
  7. 3 reg soldiers with Maxim MMG with gun shield
  8. T-34/76 with reg crew
Tim took his Germans.  To the best of my memory his army was something like the following:
  1. Vet Major with 2 vet soldiers all with SMG
  2. 10 reg soldiers with LMG and 2 SMG
  3. 10 reg soldiers with LMG and 2 SMG
  4. 10 reg soldiers with LMG and 2 SMG
  5. 3 reg soldiers with MG42 MMG
  6. 3 reg soldiers with 80mm mortar
  7. 4 reg soldiers with PaK 40 AT gun
  8. PZ IV with reg crew
For out first game we decided to play scenario #1 - Enveloment.  Tim won the dice off and chose to defend.  In this scenario the defender must deploy at least half his army on the table more than 12" from the centerline.  The rest of the army can be help in reserve and used as outflankers.  The units deployed on the table can use the hidden setup rules.  Tim chose to deploy his entire army and not use hidden setup.

As the attacker I do not deploy anything on the table at the beginning of the game.  I still have some options with what units are included in my first wave and the units in reserve.  I decided to keep my vet squad, one squad of regulars and the T34 in reserve for an outflanking action to my right.  That left my HQ, the MMG team, 2 squads of regulars and my inexperienced squad as my first wave.

The attacker gets a preliminary bombardment.  This was pretty effective as I killed three Germans and put pin markers on all the enemy units.  This ability just makes sure that on the first turn the defender is busy rallying troops rather than pushing onto the table.  It basically buys some time for the attacker and it work nicely.


I focused my first wave attack on my left using my inexperienced squad to anchor my right flank on the road that ran roughly across the table.  Tim quickly exploited this by sending his tank down the road and in 2 turns destroyed the green troops.  This is where I missed a chance to use one of the Soviet special rules - The Great Patriotic War.  This would have allowed me to re-roll the failed morale test that destroyed the unit.


Once Tim committed his tank in the center he also advanced with one of his squads on his left.  The other squad on his left would spend the entire game pinned until it was finally destroyed.  This advance my the Germans towards my open right was actually part of my plan (except for the wiping out of one of my squads) as this would draw the Germans away from their deployment zone and expose them to my flank attack.  At this point in the game, about turn three, Tim remembered that he was the defender and he probably should not be attacking.

After a couple of tries I was able to get the T34 into action and a long gun dual began between the T34 and the Pz IV.  I was also able to get my other flankers on and methodically destroyed two German squads.  By turn 4 things were looking grim on the German left.


With collapse of the German left flank two Soviet squads were able to exit the board.  The tank dual continued to the end of the game with poor shooting and failed orders becoming normal.  The battle on the Soviet left had been planned as holding action and it worked very well.  At the end of the game (turn 7) three German units had been destroyed with the loss of a single Soviet unit.  Two Soviet units had exited the German side of the table.  Final score was 9-2 Soviets.

I really enjoyed this game.  It is a very quick and easy game but like other Warlord rules, provides a dynamic tactical feel.  I am not a huge fan of the army list and army construction as listed in the rule book.  I am hoping the stand alone army books will improve this aspect of the game.  The armor seems alomost pointless and I can see that in future games the tanks are likely to drop from the lists in favor of more infantry support.

I think I may have found my go to rules for 28mm WW2.  Fun, fast and easy to learn with a nice models and future support plans, what;s not to like?  I think I will be selling off a few rule book that I will not longer need.  Anyone need a copy of Rules of Engagement or Rate of Fire?

Saturday, September 29, 2012

Kommandos

I finally finished another painting project.  Painting has been a little slow lately.  I think I have had these on the paint table for a couple of months.  Here we have 15 Ork Kommandos which includes a Nob and two Burnas.


To differentiate from normal Boyz these guys are dressed in navy blue from head to toe.  These will see their first action tomorrow and in the future they will be joined by Boss Snikrot.

Saturday, September 1, 2012

Fields

 I recently finished one of those super easy projects that is so easy you wonder what took you so long.  I have always wanted some fields for gaming and for years of have been eying the welcome mat fields.  This is a very old and very easy way to make amazing looking fields.  There are tons of how-tos out there but the reality is you don't need one.  Buy a welcome mat that looks like miniature plants or grass and cut it up.  I used two different kinds of mats, natural fiber and plastic.  The natural fiber you just cut up and you are done.  The plastic will benefit from some dry brushing of lighter greens and even tans.  I love how these can be used with multiple scales of figures.

15mm


28mm


One thing I have yet to do is go back and add some earthy tones to the base and edges of the fields to make them look more realistic.  The work just fine as is but I think adding the browns to the base will make them pop.  If you haven't make any of these go do it!  They are easy and look great.