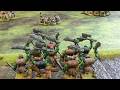
I added a few support teams to my British 8th Army. These Perry minis have really grown on me and I am looking forward to working on more of these great WW2 models.
First up is the Vickers team. This is a four man set but for Bolt Action you only need three. This will allow me to re-purpose the extra figure for some other function. These figures are so small the gun and both crew easily fit on a 40mm round base.
Next is the 3" mortar team. Like the Vickers team this is a 4 figure set where only 3 are needed in the game. I will be using the spotter figure as an artillery observer and the Vickers commander will fill in as the spotter for the mortar. Again, the figures are so small I was able to easily fit three figures and the mortar on a single 40mm round base.
Lastly is the Perry 6 pdr gun for the 8th army. This model is really beautiful but a little fiddly to build. The gun and the entire crew is on a three inch base. For Bolt Action I only need three crew but I decided it looked better with all four figures. Make no real difference for game play, just treat the team as having three wounds.
I have a few other items for this project so stay tuned for more Perry goodness.
Sunday, November 8, 2015
Thursday, October 22, 2015
27th Regiment d'Infanterie de Ligne
This installment of the Napoleonic French project has the first and second battalions of the 27th regiment. It so happens that between Warlord and Victrix I had both battalion flags. This is the only regiment that I have more than one battalion flag for so I had to do both.
Like the other installments these figures are all Victrix. The next batch is likely to be Warlord but it will be a ways away. Time to take a break from these guys.
![]() |
| 1st Battalion 27th Regiment |
![]() |
| 1st battalion command |
![]() |
| 1st battalion grenadiers |
![]() |
| 2nd battalion 27th regiment |
![]() |
| 2nd battalion command |
![]() |
| 2nf battalion voltiguers |
![]() |
| The 27th regiment |
Labels:
28mm,
Black Powder,
Napoleonic French,
Victrix
Sunday, October 4, 2015
No Man's Land - A Great War Battle Report
Tom and I got together yesterday for our second Flames of War Great War battle. The scenario we played was No Man's Land. Tom had picked his own set of trenches so this was a good excuse to get them on the table. The forces were the same lists we used for our first game but this time Tom would play the Germans and I took the British.
This is an interesting scenario and very different from other FoW scenarios I have played. The table is divided into quarters. Each player has a trench line on their side. The main deployment zone for each player is from their trench line to their table edge. The Germans would be the attackers and the British defending. Each side placed an objective in no man's land and near each friendly objective is a patrol platoon. The goal is to capture the enemy objective while defending their own.
![]() |
| The British patrol starts near their friendly objective and supported by guns and HMGs. |
Labels:
15mm,
Battle Report,
Battlefront,
Flames of War,
World War 1
Wednesday, September 30, 2015
Another French Battalion
Just over 4 years ago I painted my first unit of French troops for the Napoleonic era. I was pretty excited at the time to finally be working on a long dreamed of project. My local group's discovery of the Black Powder rules had several of us excited about jumping into a big project. Well, that dream slowly faded into the background and several of my friends moved on from the idea.
I never gave up on the dream of doing Napoleonic Black Powder games and have been slowly adding models to the collection and the paint queue. Today I finished the second French battalion for this project. Sadly, at this rate I will be too old to actually use them once I have enough painted for a game. That just means that I need to get on the ball and get some stuff painted!
I still have a couple of friends who have an interest in the project so things are not hopeless. In fact, I am working adding a collection of Russians. These will take a back seat to the French as you can't have a proper Napoleonic battle without the French. It feels good to get this project back on the paint bench.
I have two more Victrix line battalions assembled and in the painting process. Once those are done I will paint a commander and a gun and have a brigade ready for action. I would like to have this phase done by the end of the year.
![]() |
| 1/8 Line regiment. The figures are Victrix and are still my favorite of the plastic figures. |
I never gave up on the dream of doing Napoleonic Black Powder games and have been slowly adding models to the collection and the paint queue. Today I finished the second French battalion for this project. Sadly, at this rate I will be too old to actually use them once I have enough painted for a game. That just means that I need to get on the ball and get some stuff painted!
![]() |
| My entire painted French Napoleonic collection. 1/8 line regiment and the 1/2 line regiment. |
I still have a couple of friends who have an interest in the project so things are not hopeless. In fact, I am working adding a collection of Russians. These will take a back seat to the French as you can't have a proper Napoleonic battle without the French. It feels good to get this project back on the paint bench.
I have two more Victrix line battalions assembled and in the painting process. Once those are done I will paint a commander and a gun and have a brigade ready for action. I would like to have this phase done by the end of the year.
Labels:
28mm,
Napoleonic French,
Victrix
Wednesday, September 23, 2015
Ork Painboy and Grot Orderly
It was exactly a year ago that I painted my last 40K figures. After all the Flames of War I have been painting I needed a break. This Painboy and Grot Orderly set has been sitting on my to do shelf for a couple of years. It was just the thing to clear the painting pallet so to speak.
I also painted an ammo runt but I just could not get a good picture. Now, back to something more useful.
Labels:
28mm,
40K,
Games Workshop,
Orks,
Sci-fi
Thursday, September 17, 2015
Late War German Grenadier Company for Flames of War
My late war German grenadier company is finished. This marks the second complete Flames of War army I have painted in the last 30 days. I have bee collecting figures for this army for almost a year, maybe a little longer. A standard grenadier force has been a project I have wanted to do for a long time and it feels good to get this one done. It will actually see a lot of table-time as a mid-war force for our upcoming Kursk campaign.
![]() |
| Grenadier platoon 1. These are all plastic Battlefront figures. I really fell in love with these models while painting them. |
![]() |
| Platoon 2 is just the same as platoon 1. |
![]() |
| Platoon three is also Battlefront plastic figures but the panzerschreck team is metal figures from Peter Pig. |
![]() |
| The HMG platoon is metal Battlefront figures. When I decide to add a second HMG platoon I might use PSC. That would allow me to built two platoons of mortars as well... |
![]() |
| Battlefront plastic PaK40 platoon from the Open Fire set. These are nice models but a little flimsy on the barrels. Hopefully these hold up on the table. |
![]() |
| Battlefront NW42 Nebelwerfer battery. The NW41 is probably more common but just about every German army in Flames of War has nebs. |
![]() |
| Opel Blitz 3-ton trucks. These are transports for the gun and artillery platoons. I am pretty sure I will never need more than these 4 trucks. |
Labels:
15mm,
Battlefront,
Flames of War,
Peter Pig,
World War II
Sunday, September 6, 2015
The Big Push - A Great War Battle Report
Last weekend Tom and I decided to try out Flame of War Great War. (I already outlined the army painting drama in a previous post.) I have been dying to try this for more than a year and was really excited to finally get it on the table. Tom has been interested but was not really excited about Battlefront's decision to start the period in 1918. Like many gamers, Tom was concerned that a trench slaughter would not make for an entertaining game. I can understand the concern but after reading through the rules for the period a few times I thought it would work. The only way to know would be to put it on the table.
With those apprehensions noted we played the classic trench assault scenario - The Big Push. This is the first of the three scenarios in the Great War booklet and when combined with the two from Wargames Illustrated, marks the beginning of what could easily be a campaign.
Naturally, have two forces prepared for the game. Each was based on the forces that you get in the initial army boxes - Blitz's Battlegroup and Mitchell's Marauders. Point level was 1500.
The German force is an Infantry Company from a reserve division so the troop rating is confident trained. The list is as follows:
HQ
CO and 2iC with SMG upgrade
3 Flamethrowers
3 AT rifles
2 Granatenwerfers
Marksman (the term sniper was not common in the period)
Combat
2 Infantry Platoons with 6 Rifle teams, 2 MG teams and SMG upgrade for the command
Weapons
Infantry Machine Gun platoon with 4 HMG
Support
1 A7V tank
1 Infantry gun platoon with 2 7.62cm Krupp guns
The British force is based on an Elite Division and is rated confident veteran. In theory, this should make the British force smaller but in reality both armies would have 6 platoons and almost the same number of bases. The German had a slight advantage due to the large number of HQ upgrades they could afford. The British list is as follows:
HQ
CO and 2iC pistol teams
Marksman
Combat
2 Rifle Platoons with 4 rifle, 2 MG and 2 rifle grenades
Weapons
MG Platoon with 3 HMG
Support
Mk IV male tank
Artillery Detachment with 2 OQF 18 pdr gun
Tom took the British and I the Germans. We rolled off for attacker/defender as we both had a tank and neither had an artillery battery. In the GW an artillery battery is auto-defend and tanks are auto-attack so a dice roll was required. I won and chose to attack thinking that both armies would be playing too their strengths. Generally speaking, CT armies are better on the attack as the lower point cost allows for bigger armies. Veteran armies, however, are much stronger in defense where their skill along with terrain make them very hard to hit.
The terrain setup is pretty well static with the defender's trenches dominating the table. For our game we used some craters, roads, shattered woods and damaged buildings. The defenders also get up to 6 barbed wire sections to go in no-mans land (naturally I forgot to bring those so we have to improvise with some store terrain). Since the attacker sets up 2" off the center line most of the table on their side is not of much consequence.
In all the game would go 5 turns with the Germans being in a great position on turn two to get the win. Bach decisions by me in deployment and movement doomed the attack. I really like how this played out and Tom and I had lots of fun. It was much more of a nail biter of a game that you might expect. The key to this is the close starting distance. Basically the attacker is at the final phase of a battalion level attack. The major blood crossing no-man's land has been shed and you are commanding a fresh company for the final assault. Even with that the Germans took huge casualties but it was a very winnable game. I am looking forward to trying this again. I am sure I will do better on the next attack...
With those apprehensions noted we played the classic trench assault scenario - The Big Push. This is the first of the three scenarios in the Great War booklet and when combined with the two from Wargames Illustrated, marks the beginning of what could easily be a campaign.
Naturally, have two forces prepared for the game. Each was based on the forces that you get in the initial army boxes - Blitz's Battlegroup and Mitchell's Marauders. Point level was 1500.
The German force is an Infantry Company from a reserve division so the troop rating is confident trained. The list is as follows:
HQ
CO and 2iC with SMG upgrade
3 Flamethrowers
3 AT rifles
2 Granatenwerfers
Marksman (the term sniper was not common in the period)
Combat
2 Infantry Platoons with 6 Rifle teams, 2 MG teams and SMG upgrade for the command
Weapons
Infantry Machine Gun platoon with 4 HMG
Support
1 A7V tank
1 Infantry gun platoon with 2 7.62cm Krupp guns
The British force is based on an Elite Division and is rated confident veteran. In theory, this should make the British force smaller but in reality both armies would have 6 platoons and almost the same number of bases. The German had a slight advantage due to the large number of HQ upgrades they could afford. The British list is as follows:
HQ
CO and 2iC pistol teams
Marksman
Combat
2 Rifle Platoons with 4 rifle, 2 MG and 2 rifle grenades
Weapons
MG Platoon with 3 HMG
Support
Mk IV male tank
Artillery Detachment with 2 OQF 18 pdr gun
Tom took the British and I the Germans. We rolled off for attacker/defender as we both had a tank and neither had an artillery battery. In the GW an artillery battery is auto-defend and tanks are auto-attack so a dice roll was required. I won and chose to attack thinking that both armies would be playing too their strengths. Generally speaking, CT armies are better on the attack as the lower point cost allows for bigger armies. Veteran armies, however, are much stronger in defense where their skill along with terrain make them very hard to hit.
The terrain setup is pretty well static with the defender's trenches dominating the table. For our game we used some craters, roads, shattered woods and damaged buildings. The defenders also get up to 6 barbed wire sections to go in no-mans land (naturally I forgot to bring those so we have to improvise with some store terrain). Since the attacker sets up 2" off the center line most of the table on their side is not of much consequence.
![]() |
| The German left and center. The HMG platoon deployed in the shattered woods would turn out to be a mistake as it did not provide bullet-proof cover like the cratered ground just outside the woods. |
![]() |
| The German right and center. In retrospect the trench guns would have been more use in direct support of the platoons rather than in the center where they were easy targets for the 18 pdrs. |
![]() |
| On the German left the attack was bogging down at the wire. 18 pdr fire was damaging the A7V and then poor movement by the German infantry effectively too the tank out of the fight. |
![]() |
| Remnants of platoon 1 in the trenches and platoon three making their assault. Defensive fire would be too much for platoon three and they would be pushed back. |
![]() |
| With the failure of platoon three's assault the British were able to shift their defense to the German left and clear the trenches. Platoon three would die in no-man's land. |
In all the game would go 5 turns with the Germans being in a great position on turn two to get the win. Bach decisions by me in deployment and movement doomed the attack. I really like how this played out and Tom and I had lots of fun. It was much more of a nail biter of a game that you might expect. The key to this is the close starting distance. Basically the attacker is at the final phase of a battalion level attack. The major blood crossing no-man's land has been shed and you are commanding a fresh company for the final assault. Even with that the Germans took huge casualties but it was a very winnable game. I am looking forward to trying this again. I am sure I will do better on the next attack...
Labels:
15mm,
Battle Report,
Battlefront,
Flames of War,
World War 1
Subscribe to:
Posts (Atom)